Showing posts with label racing car. Show all posts

Wolseley Hornet engine finish build and pre run preparation .... please click here to open

 It is a busy November here. As well as trying to get the Standard Vanguard (further post to follow) up together before Christmas, we are currently altering the Wolseley workshop engine stand to allow us to briefly run the engine in the workshop. This is to strengthen the supports as well as give me access to fit the front pulley, something I had overlooked when I made the wooden stand! The engine will the be run very briefly to check oil pressure and operation but avoiding prolonged off load running to avoid glazing the bores.

The nature of this, largely one off work, is always very time consuming, even to the end. I 've been caught out with a clearance problem on the inlet manifold and some casting issues internally. Despite being test fitted I had not foreseen this problem as the oil return pipe was not fitted until now. Rather than strip totally, you can see that I have wrapped and sealed the whole thing in a bag and then carefully hacksawed, chiselled and filed the new corner shape. We also noted a casting flaw that would allow air leakage, but that is remedied with a sealing washer beneath a bolt.

Finally, the supercharger has been bolted on, carefully monitoring the free operation of the rotors in case the tightening of the unit causes any distortion. On this point, we have also noted distortion in the carburettor manifold flange (something I had previously missed). As I tightened this to the supercharger I could easily move a 0.005" feeler gauge in an area of the joint without any nip. It is important to be careful here as any form of twist can risk distorting the supercharger housing and upset the very precise internal clearances. We will have to carefully hand face this flange and refit.

As an extra check, I have measured the supercharger rotation torque on the bench with a spring balance and measured lever point, I can use this as a datum when looking for any case of distortion and clearance changes within the housing when fitting. This can also be carried between engine test runs.

With the unit in position we have carried out further rotation tests up to 3000rpm with a battery gun.


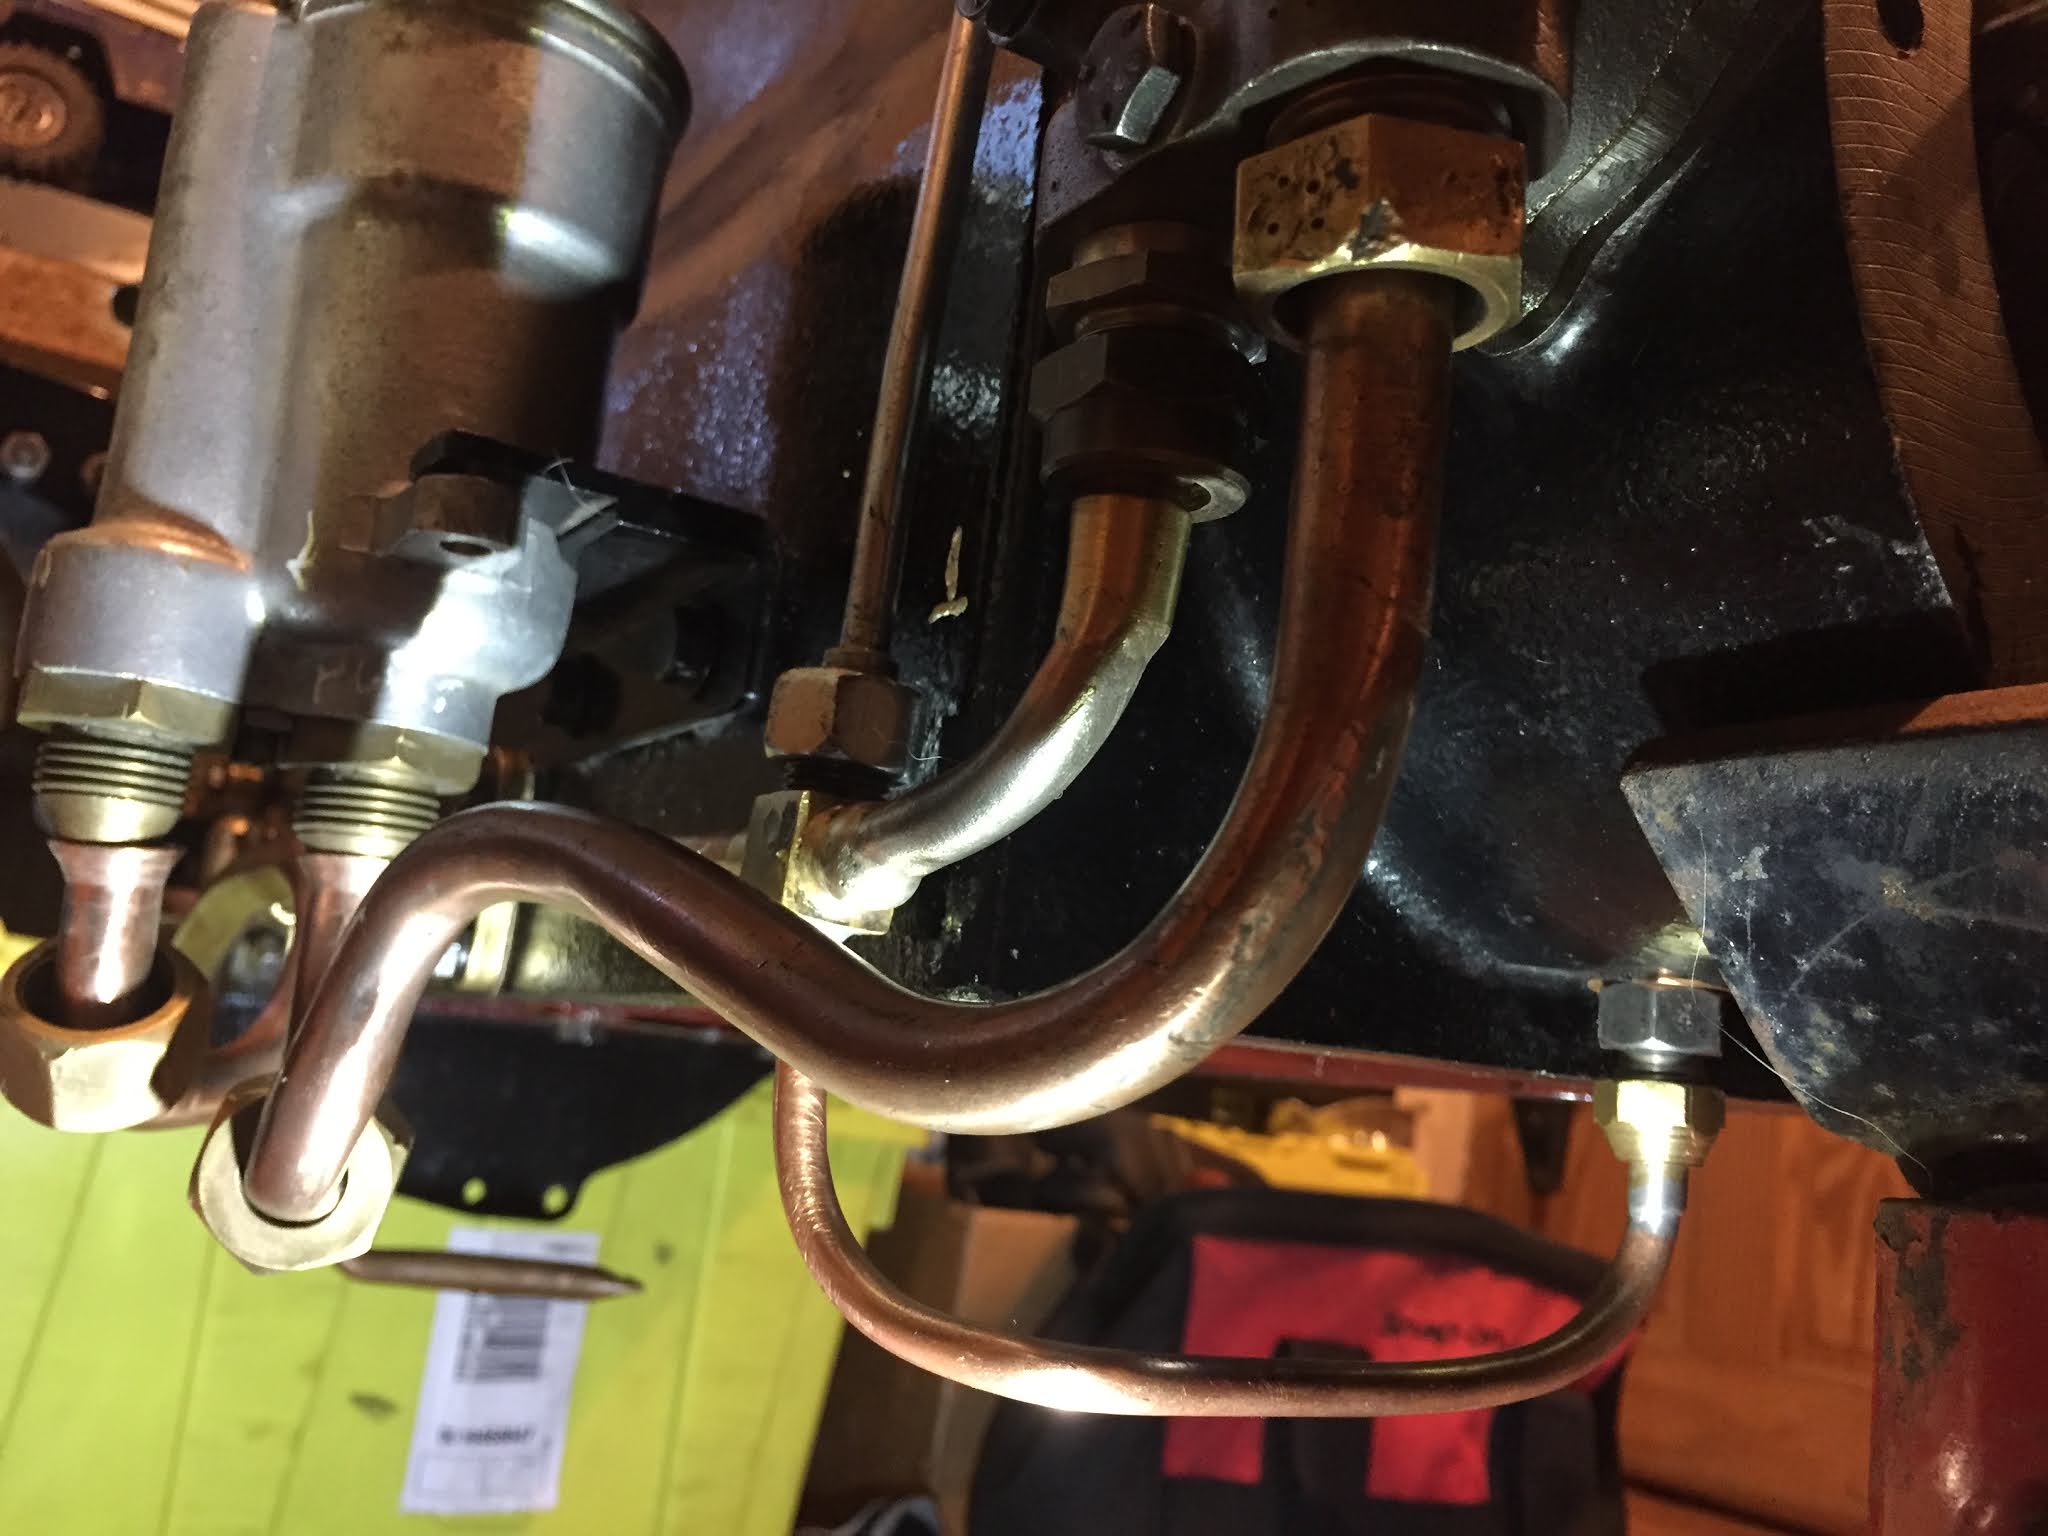

Extensive pipework can be seen above, some standard and some modified for extra oil supply.


Having modified the chain guide to suit the duplex timing chain, we have also made a new tensioner adjusting arrangement, here being adjusted to suit.


Alternative Supercharger Fitting design and 3D Printing.... please click here to see

 We have been measuring and designing new templates and adaptors. With the aid of some supplied sketches and our own dimensions, we can consider the possibility for the Wolseley to have an option to use a Volumex supercharger in the future. You can see that we've been using CAD to draw up the various components to carry out a test assembly and assessment within the CAD program. 

The photos show the parts being drawn and also a prototype adaptor being printed on the 3D printer to give a a solid model for trial. Should we wish, this will give the possibility to present a slightly scaled up print for use as a pattern for casting of particular items. It may be more cost effective to cast rather than machining from billet.

Please note, the plastic type of material we use is created from biproduct of cereal production, it is wholly recyclable.

Further updates will follow.


 The adaptors on the printer and CAD drawing at the top of the page, are to suit the inlet manifold fitting of this Volumex. This picture indicates where a bespoke end housing will be made and a drive extension will be taken from the topmost rotor to a belt drive as with the existing Wolseley supercharger arrangement.


J


Wolseley Hornet Supercharger and finishing work..... [Please Click here to open]

 Here we have the final tests and setting of the supercharger. Although simple in operation, you can see the reason for attention to clearances. The rotor engagement and disengagement are so close, it is critical that we have the timing correct to give the full clearance available. In the video we are only doing about 500 rpm... less than 10% of the actual speed in the car!

We have set the clearances and tested them at three different temperatures, noting the results carefully to a chart. This will be an area to monitor carefully during initial test runs.

Note how my hand restricting the pressure loads the battery powered gun.

We have been waiting for one drive extension shaft bearing to complete the assembly and refit to the engine.

Please press the play arrow..


In the above, we have made a mandrel to mount supercharger spacer washers that we have previously "roughed out" from EN16 bar. We then finish skim very close to size with the use of the clocked mandrel which has a boss machined to the correct depth.
 Final adjustment for the last "tenths of a thou" can be completed with an an oilstone if necessary.

We have been working on some finishing touches, including making some new studs where necessary and making an "indexing" oil flow control to the cylinder head. It is important that attention is given to this area as the use of a sporting cam and increase of RPM will increase the loads of the valve train exponentially. The original union has a fixed restricted path.

Some new studs have been machined as well as various items that had accumulated as "to do" during the build.

With the 3D printed concept, noted in previous posts.


Finished oil control indexing valve... missing the one spring that I had found just for this purpose. Last seen flying over my shoulder just before this photo!

Stud making.

Back to the drawing board, very annoying. The new duplex timing chain requires a wider tensioner. I thought my Tufnol strip rivetted on to the original steel would be a good idea, and it would have been fine in position. But trying to get it in and out of position, for slight alteration now that the chain is on, meant a little too much of a bend as I feed it down around the sprockets and chain! Back to a piece of wider spring steel strip will be a better idea I think.

As we've been waiting for bearings for the supercharger, we have used the time to revisit some areas that require further attention at some point before or after the brief initial test run. 

Below, we are altering a Tufnol block chain guide (not the tensioner previously mentioned above) to sit into the bosses of the cylinder block timing chest. It is surprising how much bespoke work that has been necessary in the building of this engine.


Wolseley Hornet: "Crossing the T's and Dotting the I's" (Please Click to Open)

 After an endless period of finishing and detailing we seem to be running out of items on the finishing list and... better still, we do not seem to be adding quite as many.

The time consuming work of a restoration goes without saying but the time consuming work in a prototypical creation and restoratrion project is exponential!

We have experimented, designed, altered,adapted, fitted new designs and trialed so many components throughout and now it all comes to a point of focus as we are near complete on the rolling chassis / body (presently delayed with the post summer Lockdown regulations in Wales and latterly England) and now we are close to the engine test run.

Although we had not expected any problems we felt it prudent to run through the supercharger and generally refresh this with new bearings and any fettling that might be necessary. With new bearings and a little dressing of a few areas we can check and set the various clearances, dress the gears and reassemble a known entity. We have made a small modification to allow the oiling of the front lower bearing, although the bearings are sealed there is some evidence that this bearing might suffer from the remains of fuel and condensation which over a period ingress into the rubber seal. I can imagine that the original design of this unit may have been to pump air alone as opposed to the fuel mix it endures during its racing career. We have also made some repairs with the use of thread inserts where necessary.
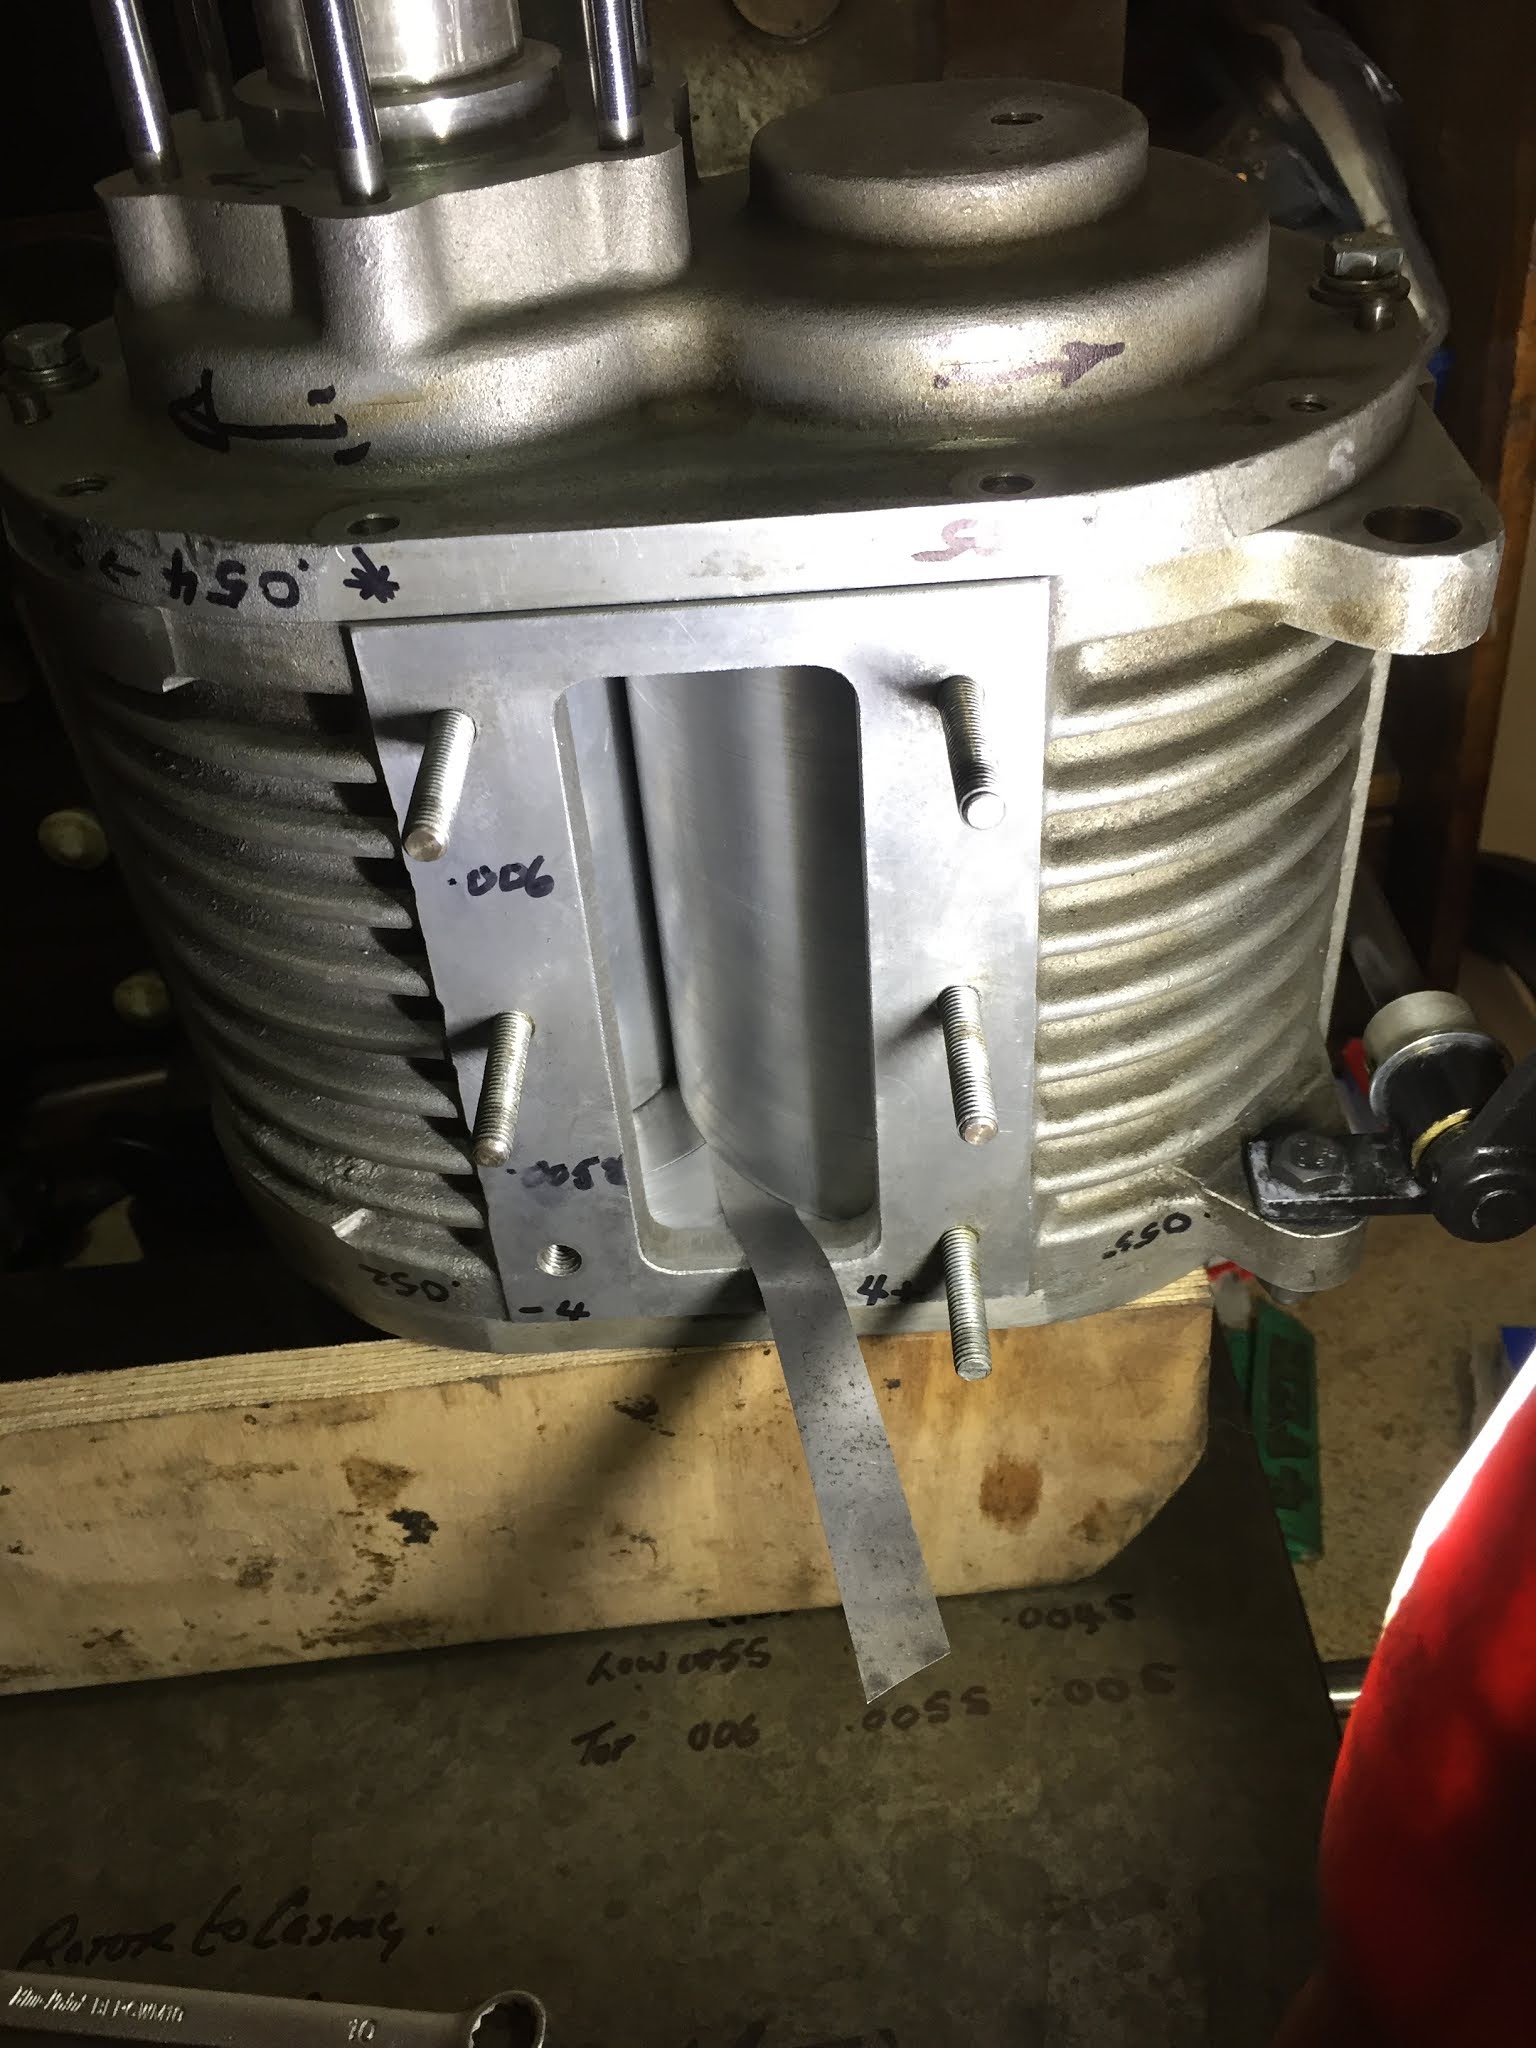
The supercharger is actually not as simple to set end face clearances as you might think. The rotors are floating axially and thrust washers dictate their position in the endplate counterbores whilst the rotor end face clearance is a factor of the housing length and rotor length. A lot to consider when measuring.

All bench measurements are noted to a chart to help us to monitor the unit during the initial period of testing. We have taken the clearance measurements over a set range of temperatures to provide us with an initial reference.

The gears that mesh the rotors are straight cut... very strong, and mounted via tapers not keys. There has been some discussion in the vintage world regarding the use of tapers and the fact they might fail as opposed to a key. My own feeling is that tapers are very good, providing they are appropriate for the design loads, in perfect contact and assembled spotlessly clean (including the absence of Loctite). A taper might just provide the first point of release should something catastrophically fail within the rotor and send ever churning fragments into your engine as a drive chain or gears soldier on!

We have also made a metering unit to replace the now rare original item that controls the oil feed to the valve train. As engine speeds increase with new materials and designs, we may consider a different oiling system at a later date to ensure that the high loads induced by a sporting camshaft are appropriately accommodated by adequate lubrication.


Rizla: For generations engineers have been using the precision of Rizla papers! I am proud to pass the tradition to Jacob...


A new locating dowel machined and fitted by Jacob.


During pressure testing of the head oil supply, we had to confirm all areas are receiving an adequate amount.


The oil delivery metering unit for testing. Alongside you can see the 3D printed item Jacob used to prove his the initial CAD design.


Mid 30's Supercharged Wolseley Hornet Special Build.... please click here to open

For a long time I have been involved in building this Wolseley into a special competition car. We have made very many bespoke items. Whilst I don't think I can post retrospective photos, here are some more photos as we move forward.
As you can see, we are set up and working toward a brief initial engine run in the workshop, this will be very brief to allow us to return to the various skew drives and other areas to visually inspect and ensure that all is well, especially in the way that they mesh together as there are so many new items that have never run with the old before. We have already "blued" with engineers blue to check the witness of engagement. We have also pressurised the oil system to prime and to check for vital leaks prior to fitting the sump. This is an incredibly effective way to illustrate any defects, including excessive clearance in new engine bearings and reground cranks.... it is all too easy to misread a micrometer despite checking many times.


With the aid of a Triumph fuel tank we have set up in preparation for a brief run.


I had initially used a section of Nylon to make an extended width chain tensioner but this was a little too thick and unforgiving, here I am riveting a section of suitable grade Tufnol onto the original tensioner. The extra width is to accommodate a duplex timing chain drive upgrade.


Smooth engagement of the oil pump was hindered by these old burrs on the coupling spline. Time for the oilstone and needle file.


The skew mechanism with the new skew gear in bronze. We have to ensure all is aligned in the brief engine run, If all ok I can drill, ream and taper pin to secure. Note the engineer's blue to provide an initial engagement witness. The steel driving gear is also new to suit.


Always be aware of raddii clearance... never take them for granted!


Here we had a small oil weep, I am checking that the assembly is now centralised and nipping the gasket. I had to carry out a metal spray repair around the cast iron inner boss and have to leave a small fillet, I have to make sure the gaskets have a sufficient diameter bore to clear the fillet and not hold off and allow the joint to weep. As you can see, we made a sleeve to help the repair from the inside. We also had to make a new shaft coupling spade, including milling a corresponding slot to allow the spade to engage and bronze weld into position.

Supercharger Adaptation Continued.

 Some more Supercharger drive over the last two weeks. All very time consuming as the clock races as if supercharged toward Christmas!