3D CAD Drawings of Volumex Adaptor Kit for Wolseley...(Click to Open)

 Continuing on from our previous post. Through the 3D printed prototypes, we can see our design's accurate fitting and function. We required some minor modifications, considerably easier on a 3D printed object than that of a final machined or cast item.

As a result the drawings can now be prepared and presented into documentation that can easily be understood and shared via email and paper form to any future parties. Shown below are screenshots of the final illustrations, visualising dimensions required for fabrication and any other necessary notes.

We just have do carry out a little more study of the drive shaft and housing, these will be completed and posted shortly.   

J


Volumex Supercharger adaptor prototype. ....please click here to open.

 Continued from previous post. Here we have some further conceptual adaptor design work to allow the option of a Volumex supercharger fitted on to the Wolseley Supercharge inlet manifold and belt drive coupling and shaft arrangement.


Nuts and Bolts! preparation. ......please click here to view

 We have often been asked about finishing fixings during restoration projects.

 Well as a bit of a post script .. or in this case pre script! I would like to add this edit and say that recently there has been a definite change. BSF stock is being dropped from many of the suppliers, as a result, the costs are escalating hugely which gives greater strength to the first two points in the following list. It also means that for the first time, I regret we will be charging for new BSF bolts even when in small quantity. We will keep this charge at the cost price.

There are several options and our decision is taken according to budget, originality and purpose.

  • We can clean, dress bruising from spanners and recover threads to re use original bolts and nuts unless they are highly stressed. In this situation, we make a careful judgement and often fit or make new.
  • We can clean, fettle, dress bruising, dress threads and oil black (Rolls-Royce use oil blacking on their original fittings before the during the pre war years). To oil black, we heat the prepared nut or bolt until it just begins to change to a straw / blue on the head and then quench in old oil. The end product is very effective and quite long lasting in reasonable conditions.
  • We can fettle as above and paint, Suncorite (Henkel) black phosphate primer is ideal, giving a very natural oil blacked look but with excellent resilience.
  • Or we can simply renew, carefully cutting "off the shelf" bolts to size or threading to produce the correct shoulder depth. We may also face the head in the lathe to remove inappropriate "modern" lettering.
As you can see there is often no quick answer, whatever we do can invariably be time consuming and easily over looked when considering time required for a project.
I personally like to use original bolts where possible, the more of the original items fitted the more satisfying the project becomes. However, if the project will be for Aero or race or highly stressed applications then new bolts of a known entity are important (and a legal requirement).

Here you can see an oil blacking process, do be aware of temperatures and related colour changes of  heated steel, do not exceed temperatures. Do not oil black structural or Aero application items unless in an authorised, controlled environment. 


Beware of the pungent oil smoke, keep the flame and any water vapour away as it is inflammable


The end product above and below. Note the brighter the bolt is prepared, the better the oil black finish.
Keep the bolts dampened with oil whenever you can after fitting.


Supercharged Inspiration! ... Please click here to open

 All of this talk of superchargers has made me supercharge "broodie".

I designed and built and raced "Mistress Quickly" 30 years ago and it was always part of my design brief to allow for later supercharging!

Now, with superchargers around us in the workshop, I began to wonder? Don't tell Mr B. who owns the Wolseley, but......


I have found a storage space for a spare Wolseley Volumex!! Doesn't look out of place does it?

FYI:
 Engine - 500cc Alcohol Weslake Speedway / Grasstrack. 
Length - 7 feet.
Height-18".
0-60mph - 2.8 sec.
Standing Start 1/4 Mile - 12 sec @ 115mph.


Alternative Supercharger Fitting design and 3D Printing.... please click here to see

 We have been measuring and designing new templates and adaptors. With the aid of some supplied sketches and our own dimensions, we can consider the possibility for the Wolseley to have an option to use a Volumex supercharger in the future. You can see that we've been using CAD to draw up the various components to carry out a test assembly and assessment within the CAD program. 

The photos show the parts being drawn and also a prototype adaptor being printed on the 3D printer to give a a solid model for trial. Should we wish, this will give the possibility to present a slightly scaled up print for use as a pattern for casting of particular items. It may be more cost effective to cast rather than machining from billet.

Please note, the plastic type of material we use is created from biproduct of cereal production, it is wholly recyclable.

Further updates will follow.


 The adaptors on the printer and CAD drawing at the top of the page, are to suit the inlet manifold fitting of this Volumex. This picture indicates where a bespoke end housing will be made and a drive extension will be taken from the topmost rotor to a belt drive as with the existing Wolseley supercharger arrangement.


J


Peugeot 401 Water Jacket Repairs

 On the Peugeot 401, we have been attending to some of the final steps, whilst we are waiting for pistons from the machine shop.

In preparation for fitting, all water jacket plates have been thoroughly cleaned up,  ready for paint and repair if required. Shown here is one of the end plates, that also acts as a hinge point for a linkage, so not an easily replaceable part. As you can see it has had some serious corrosion over the years, resulting in pitting and breaking through in places!    We have cleaned it up with a wire brush and repaired with a filling of braze in the worst of the pitting and holes, it was then cleaned up and dressed true and treated with rust killing solution. We arranged two parallel steel sections in the press to gently straighten out some of the distortion from previous repairs aswell as slight heat distortion from our braze repair.


This is only a temporary repair. We recommend to the owner that a better condition replacement should be sourced over the long run, or a replacement can be fabricated if a good condition replacement cannot be found

Wolseley Hornet Supercharger and finishing work..... [Please Click here to open]

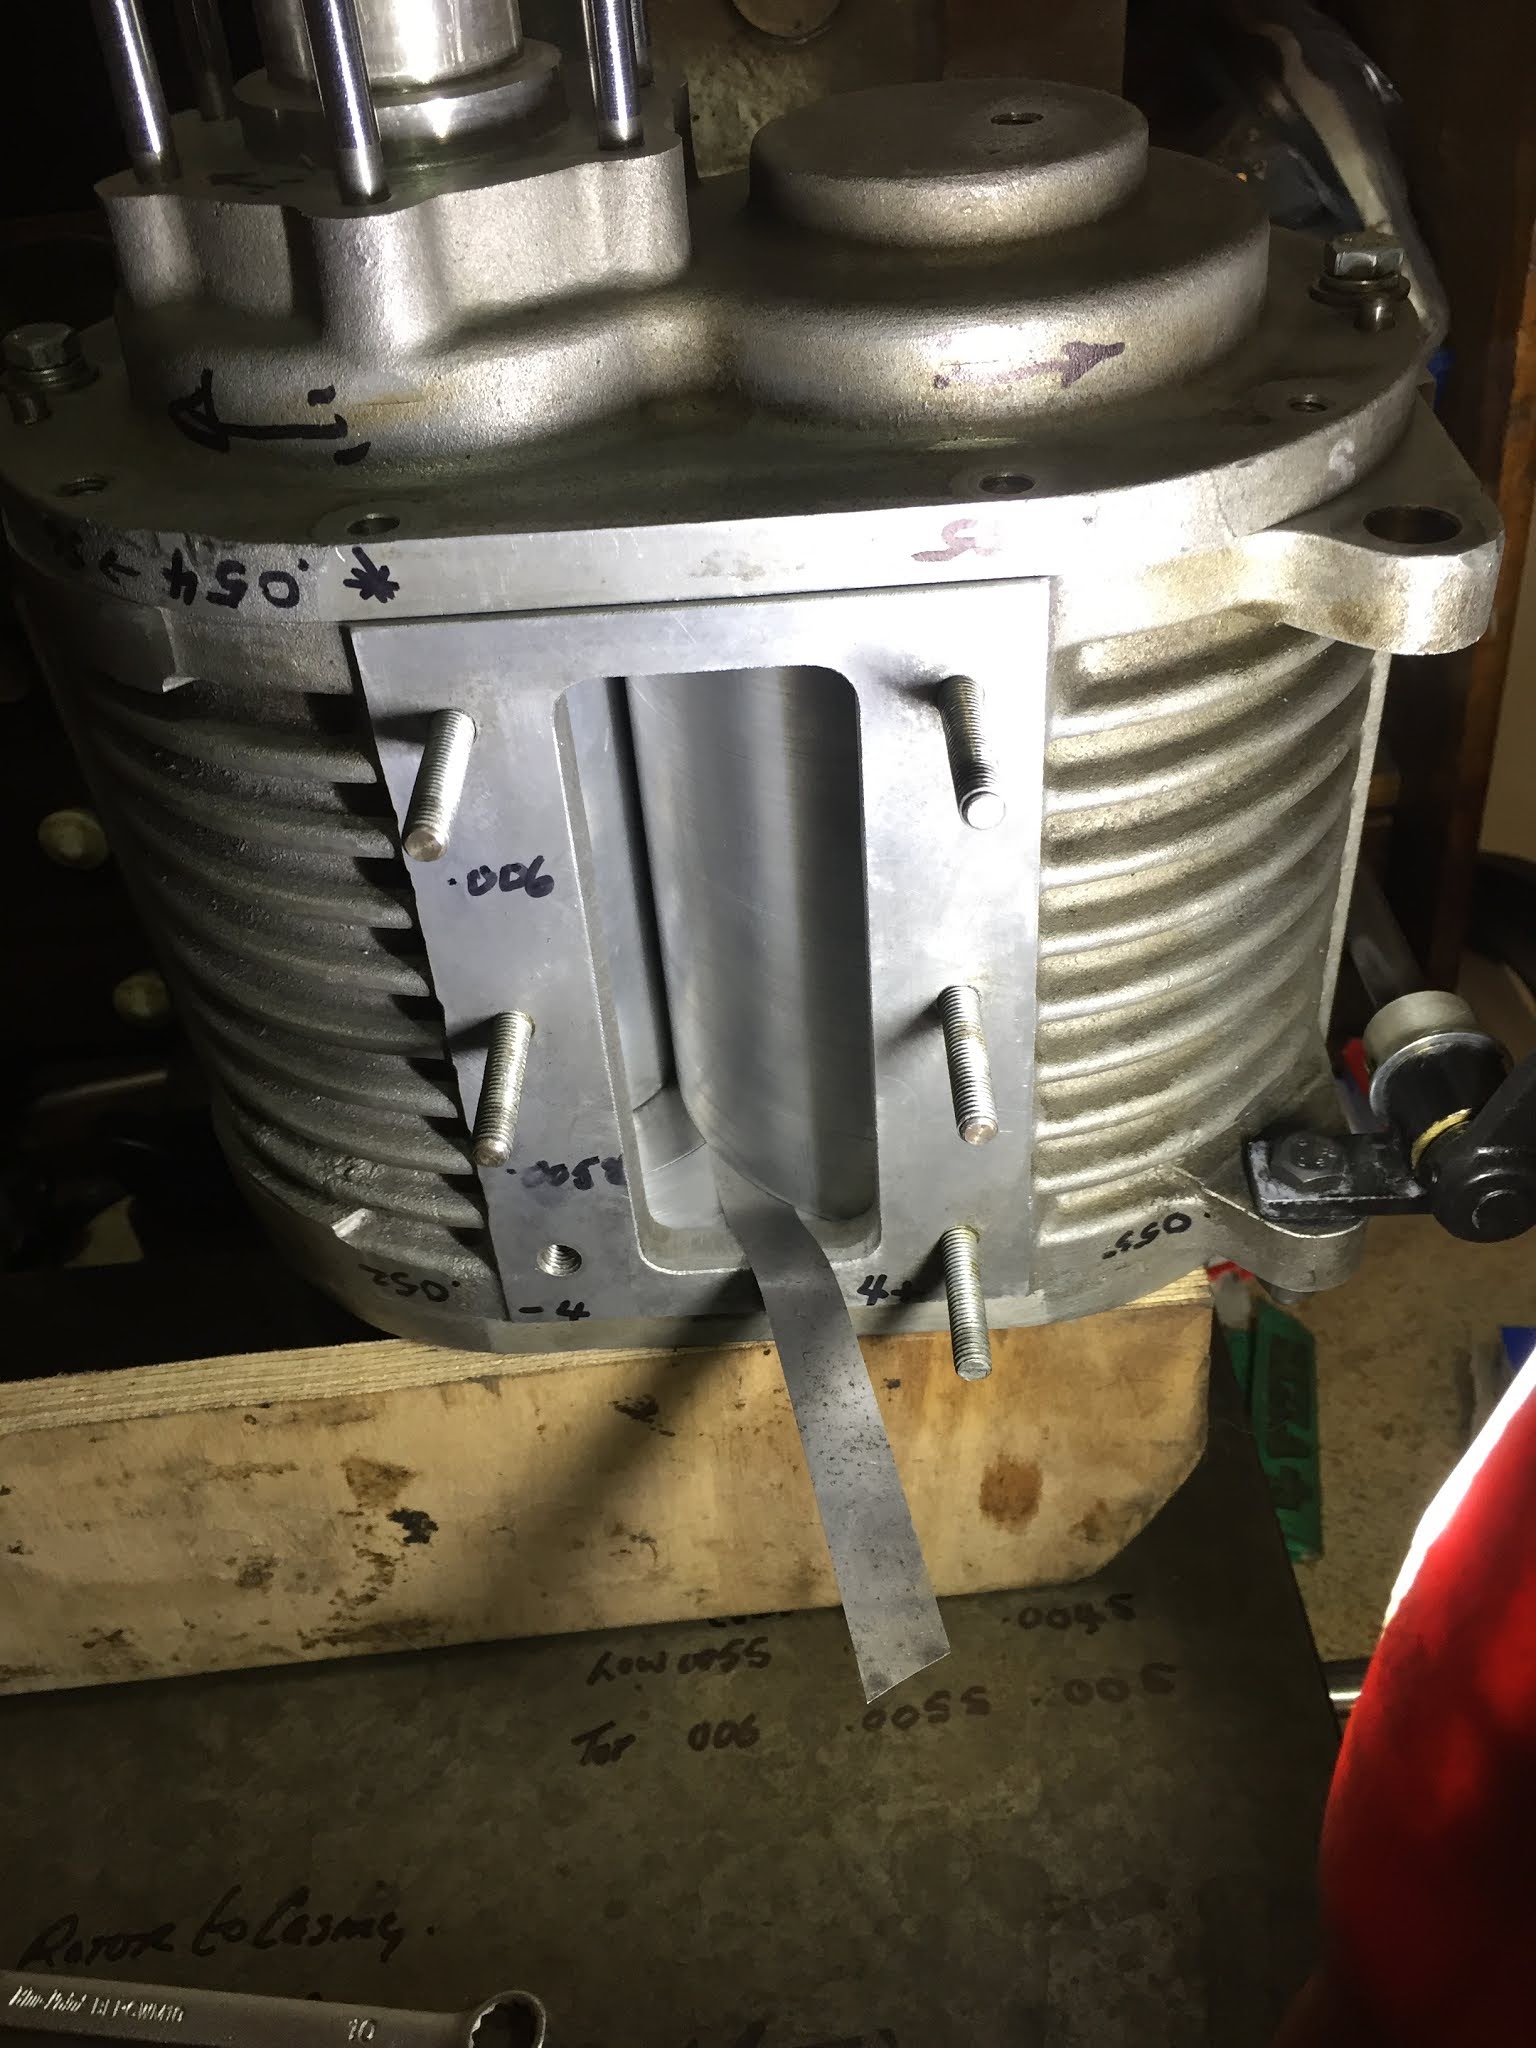
 Here we have the final tests and setting of the supercharger. Although simple in operation, you can see the reason for attention to clearances. The rotor engagement and disengagement are so close, it is critical that we have the timing correct to give the full clearance available. In the video we are only doing about 500 rpm... less than 10% of the actual speed in the car!

We have set the clearances and tested them at three different temperatures, noting the results carefully to a chart. This will be an area to monitor carefully during initial test runs.

Note how my hand restricting the pressure loads the battery powered gun.

We have been waiting for one drive extension shaft bearing to complete the assembly and refit to the engine.

Please press the play arrow..


In the above, we have made a mandrel to mount supercharger spacer washers that we have previously "roughed out" from EN16 bar. We then finish skim very close to size with the use of the clocked mandrel which has a boss machined to the correct depth.
 Final adjustment for the last "tenths of a thou" can be completed with an an oilstone if necessary.

We have been working on some finishing touches, including making some new studs where necessary and making an "indexing" oil flow control to the cylinder head. It is important that attention is given to this area as the use of a sporting cam and increase of RPM will increase the loads of the valve train exponentially. The original union has a fixed restricted path.

Some new studs have been machined as well as various items that had accumulated as "to do" during the build.

With the 3D printed concept, noted in previous posts.


Finished oil control indexing valve... missing the one spring that I had found just for this purpose. Last seen flying over my shoulder just before this photo!

Stud making.

Back to the drawing board, very annoying. The new duplex timing chain requires a wider tensioner. I thought my Tufnol strip rivetted on to the original steel would be a good idea, and it would have been fine in position. But trying to get it in and out of position, for slight alteration now that the chain is on, meant a little too much of a bend as I feed it down around the sprockets and chain! Back to a piece of wider spring steel strip will be a better idea I think.

As we've been waiting for bearings for the supercharger, we have used the time to revisit some areas that require further attention at some point before or after the brief initial test run. 

Below, we are altering a Tufnol block chain guide (not the tensioner previously mentioned above) to sit into the bosses of the cylinder block timing chest. It is surprising how much bespoke work that has been necessary in the building of this engine.


A glimpse into the life of The Art In Engineering Co.

 https://www.youtube.com/watch?v=W9KInohmemk


Wolseley Hornet: "Crossing the T's and Dotting the I's" (Please Click to Open)

 After an endless period of finishing and detailing we seem to be running out of items on the finishing list and... better still, we do not seem to be adding quite as many.

The time consuming work of a restoration goes without saying but the time consuming work in a prototypical creation and restoratrion project is exponential!

We have experimented, designed, altered,adapted, fitted new designs and trialed so many components throughout and now it all comes to a point of focus as we are near complete on the rolling chassis / body (presently delayed with the post summer Lockdown regulations in Wales and latterly England) and now we are close to the engine test run.

Although we had not expected any problems we felt it prudent to run through the supercharger and generally refresh this with new bearings and any fettling that might be necessary. With new bearings and a little dressing of a few areas we can check and set the various clearances, dress the gears and reassemble a known entity. We have made a small modification to allow the oiling of the front lower bearing, although the bearings are sealed there is some evidence that this bearing might suffer from the remains of fuel and condensation which over a period ingress into the rubber seal. I can imagine that the original design of this unit may have been to pump air alone as opposed to the fuel mix it endures during its racing career. We have also made some repairs with the use of thread inserts where necessary.

The supercharger is actually not as simple to set end face clearances as you might think. The rotors are floating axially and thrust washers dictate their position in the endplate counterbores whilst the rotor end face clearance is a factor of the housing length and rotor length. A lot to consider when measuring.

All bench measurements are noted to a chart to help us to monitor the unit during the initial period of testing. We have taken the clearance measurements over a set range of temperatures to provide us with an initial reference.

The gears that mesh the rotors are straight cut... very strong, and mounted via tapers not keys. There has been some discussion in the vintage world regarding the use of tapers and the fact they might fail as opposed to a key. My own feeling is that tapers are very good, providing they are appropriate for the design loads, in perfect contact and assembled spotlessly clean (including the absence of Loctite). A taper might just provide the first point of release should something catastrophically fail within the rotor and send ever churning fragments into your engine as a drive chain or gears soldier on!

We have also made a metering unit to replace the now rare original item that controls the oil feed to the valve train. As engine speeds increase with new materials and designs, we may consider a different oiling system at a later date to ensure that the high loads induced by a sporting camshaft are appropriately accommodated by adequate lubrication.


Rizla: For generations engineers have been using the precision of Rizla papers! I am proud to pass the tradition to Jacob...


A new locating dowel machined and fitted by Jacob.


During pressure testing of the head oil supply, we had to confirm all areas are receiving an adequate amount.


The oil delivery metering unit for testing. Alongside you can see the 3D printed item Jacob used to prove his the initial CAD design.